|
Item View and Edit |
|
|
Introduction Navigation Inventory Assemblies Customer Orders Purchase Orders Works Orders Contacts Reports Tools |
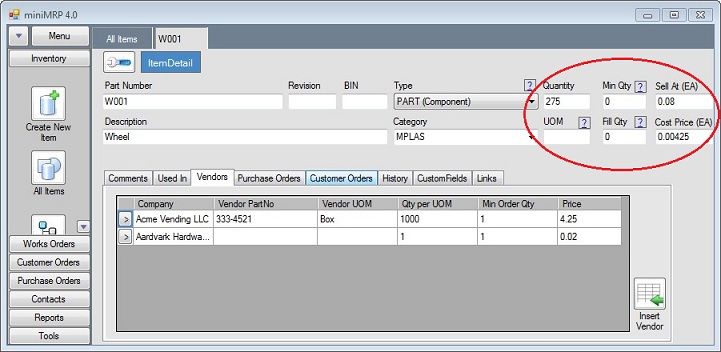
Using the MiniMRP menu select "All Components". Find the item you want to edit and double click the row and MiniMRP displays the Item Detail window.
Some fields on this form, such as Part Number and Description, are quite straight foreward so don't require any additional explanation. BIN - a free text field where you can enter a location such as a shelf or bin number. Type - Is the item an assembly or a component or some other type. Category - You might wish to assign your items to specific catgeroes. You can select a category from the drop-down list or create a new one by keying a new category name into the category box..
UOM -Unit Of Measure. Don't confuse this with your vendor's UOM. This is a free text field where you can enter some information about how the item is counted. For example if it's wire or cable you might wish to use this field to indicate whether the quantity is measured in centimeters, Inches. Feet or Meters. Or maybe it's a liquid - Pints, Liters, Gallons ? Don't worry too much about this - when you buy, sell, consume the item you can use other units of measure or even fractions thereof. Min Qty - (Minimum Quantity) If you want miniMRP to tell you when the onhand quantity of this item has fallen to a low level then enter that quantity here. When the On-Hand quantity falls below this level the item will appear in the 'Shortages' report. (See Reports) Fill Qty - You can use this as a reminder or instruction to your buyer indicating the desired stock 'Fill' level. MiniMRP can also use this to pre-populate purchase orders based on the Fill Qty. Leave it as zero and this feature won't be used. Sell At - When you sell items this is the price that will appear on your invoices. Of course you can change it on the invoice later but to make a permanent change for all future invoices you'd need to change it here. Cost Price - You can not edit the cost price via this box - If this item is a component then you will edit the vendor prices etc via the vendors tab shown in the lower section of the window. You can have any number of vendors with different prices and supply criteria and one of those vendors would be your 'default'. It's the default vendor's price which appears in this box and it's this price that is used when miniMrp calculates costings for assemblies and Bills Of Material. In our picture above notice the relationship between the Vendor's Qty Per UOM, The Vendor's Price and the actual Cost Price (Each) shown in the upper right corner of the window. But if this item was an assembly then the cost price would show the 'Build Cost' which would be calculated automatically based on the cost of all components used to build the assembly.
You might wish to arrange your inventory in categories - it might help you find items later. Place the item into a category that already exists by selecting from the drop down category list or create a new category by keying in the name driectly into the category box. When you're done click the 'Save' button. |
|
View/Edit |