
SQL Tools for MiniMRP.
Restore a database from a previous version of MiniMRP (or create a new one)
This stage assumes that your MariaDB/MySQL login/account has permission to create and administer databases. If you do not then you should first create/edit the login/account on your NAS device as explained in the Server Setup page.
The MiniMRP program does not contain the tools necessary to create or restore SQL Server databases. We've done it that way so that remote or less experienced users of MiniMRP can not accidentally delete or restore a database on a Server. For that purpose we have a separate tool which you, as the system administrator, may wish to delete from users' computer after installation.
MiniMRP usually installs in the folder
C:/Program Files(x86)/MiniMrp5
Look in that folder and see the /Tools/ sub folder. In the Tools folder is the program DBTools
Start the DBTools program. Be sure DBTools is version 5 or above - older versions can't connect to MariaDB/MySQL Servers.
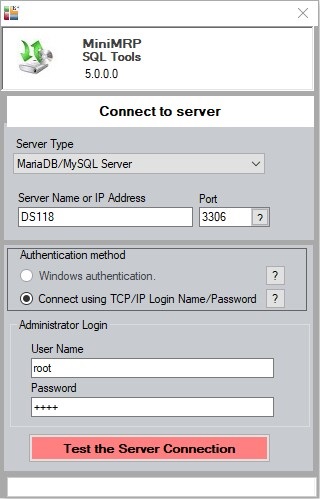
Select: Server Type "MariaDB/MySQL Server" and other options as shown above. In our example we're testing with a Synology DS118 device and we're able to enter just the device name 'DS118' and the default port number '3306'. Depending on your device and network setup you may need to enter the IP address or a different port number for the NAS device instead.
Enter the User Name and Password and click the button to "Test the Server Connection". If all was setup correctly you should get a "Connected" notification and the display changes to offer more options. "Create, Backup, Restore and User" tabs across the middle of the window as shown in the picture below.
Restoring from a backup or previous version of MiniMRP.
If you are migrating from a previous version of MiniMRP or migrating from a standard/non-sql database to a professional edition on MariaDB/MySQL then select the "Restore" option.
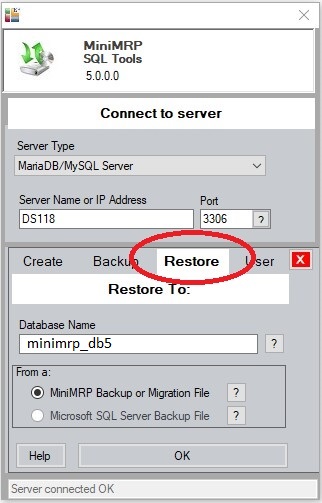
If you select "Restore" and click OK you'll be able to navigate to a MiniMRP backup file or even select a v3 (emrp.axi) or v4 (mrp4data) database file. The MiniMrp data will be imported into a new v5 database.
Migration from a local backup file up to the server is quite a big process so if your database is very big, ie many 1000's of items, orders etc, then the migration may take a few minutes. The data is copied to a temp file before restoring/migrating so the original data file is not changed in any way so previous versions of Minimrp won't be affected.
Note: If you do not have any previous version and this is a brand new installation of MiniMRP then instead of the 'Restore' option you can select the 'Create' to create a new empty database on your server.
Creating a MiniMRP User.
This step creates a default account on the database server with minimal set of permissions to run MiniMRP across your network.
If you'd rather use phpMyAdmin, or other admin tools, to create and manage your sql server user accounts you should use your chosen tool to create at least one user account with permission to connect from other computers with Select, Insert, Update and Delete permissions on the MiniMRP database. Then skip ahead to start MiniMRP.
At this point you could even just skip this step and just use the MariaDB 'root' login that you created earlier to run MiniMRP. But you really shouldn't give everyone root access to your server.
Assuming you want to create the default user with default permissions for MiniMRP Click the "User" tab.
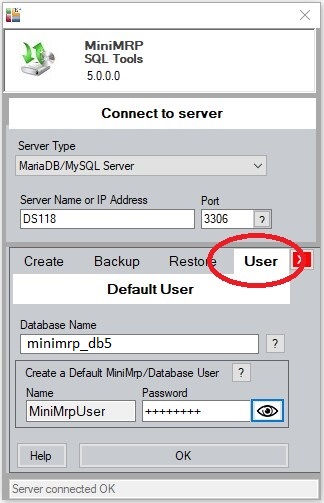
Enter a password - the characters are obscured - Click the 'eye' button to see/confirm if necessary. Click the 'OK' button to create the user account. If the account already exists it will be replaced with the new one with the new password (You could use this to change your default user password regularly if you wished)
Even if you have a few users they can all use this one user account so you only need to do this once. But, as mentioned above, you can always use phpMyAdmin to create/administer more user accounts if you wish.
See next page - Setting up MiniMRP to connect to NAS
![]()